
Using the Guide
The Guide is easy to use. It's logical. If you want to get out of a menu or area, just press Exit and you'll be back on your TV program. With the most recent range of receivers, such as the 209, 319, 505, 530, Essential HD Receiver (600), Advanced HD Receiver (605) and Advanced HDPVR (630) you can even browse the on-screen guide while you watch your favourite shows.
 When you press the 'GUIDE' button, the onscreen guide will appear with the channel you're watching highlighted. If you own one of the newer model receivers, you will also see the video from the current channel in the upper corner of the screen. Use the arrow buttons to navigate through the listings, moving up or down, left or right. For faster scrolling, use the channel up and down keys to scroll through a whole screen of listings.
On the older model receivers, if you want to scan for programs, use the Mini-guide. You'll get this feature by pressing the 'GUIDE' button twice. It will show you two lines of the guide on the bottom third of the screen. You can see what's on other channels while continuing to watch a program. Press the 'GUIDE' button again to return to your program or press the 'GO BACK' button to return to the full onscreen guide.
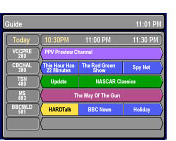
On the legacy satellite receivers such as the DSR 401, DSR 315, DSR 205 or DSR 421, there are 5 colors used to help you find the program you are looking for.
The programs are colour-coded, so you can easily find what to watch:
Pink – Movies
Green – Sports
Purple – Pay Per View
Blue – All other programming. Network shows, news, education and children's programming.
Yellow – Shows you where the cursor is
On newer model receivers such as the DSR 209, DSR 319, HDDSR 505, HDPVR 530, Essential HD Receiver, Advanced HD Receiver, or Advanced HDPVR, there are a few more colors to find your favourite programs even easier.
Learn about the new Advanced Receiver menus and features


You can learn more about the symbols and colors in the on-screen guide here.
Info


If you press Info while watching a channel, you'll get the details on the show you're watching. This can include parental ratings, cast listings, HD content and more.
If you're in the guide, highlight the listing in yellow and press Info to get program details.
No Info? Or limited information? This information hasn't been made available from the broadcaster. For example, we don't get detailed programming information for most radio stations. These channels won't have information listed.
Browse
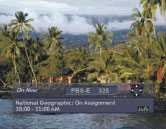

Use the arrow buttons to scroll through channels and times.
Like the larger Guide, the Browse feature will bring up the guide at the channel you're watching.
Interests
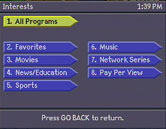

- All Programming
- Favourites
- Movies
- News / Education
- Sports
- Music
- Network series
- Pay Per View
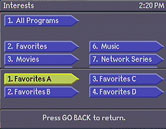
On a newer model receivers such as the DSR 209, DSR 319, HDDSR 505, HDPVR 530 your selection will be slightly different. You fine-tune your selection from the following categories:
- Movies
- News / Education
- Sports
- Children / Family
- Music
- Network series
- Pay Per View
Highlight one of the options and press the 'ENTER' button to limit your guide to only show those types of channels. If you choose Sports, for example, your onscreen guide will only list programs that have sports.
Favourites
You can set up to four Favourites lists, so everyone in the family can program his or her channels into the Guide.
Here's how to program Favourites:
- Press the Options key.
- Press Set Guide and Favourites. (2)
- Scroll down to Set Favourite channels. (2)
- You'll have the option to chose A, B, C or D. Highlight your choice and press Enter.
- A list of channels will appear. The top channel will be the one you're on. Use the down arrow key to scroll through the channels.
- When you reach one you want to add to your Favourites, highlight it and press Enter.
- A check will appear in the box. Go through all the channels adding checks to your Favourites.
- All the checked channels will appear on screen when you specify your Favourites list.
Using the newer receivers such as the DSR 209, DSR 319, HDDSR 505, HDPVR 530 setting up the program Favourites is still just as easy:
- Press the OPTIONS key.
- Choose Favourites. (3)
- Scroll to right to select an open a Favourites list (such as Fav 1)
- Press ENTER to place a check mark on your selection.
- Select >MODIFY LIST. A list of channels will appear. The top channel will be the one you're on. Use the down arrow key to scroll through the channels.
- When you reach one you want to add to your Favourites, highlight it and press Enter.
- A check will appear in the box. Go through all the channels adding checks to your Favourites.
- Once you have completed your selections choose SAVE.
- Choose SAVE again on the favourites screen to lock in your changes.
- Now you can change the current favourites list by simply pressing the Favourites button on your remote.
You can easily edit your list. Simple go back to the menu, highlight a checked channel and press Enter. The check will disappear. You can add or subtract channels from your Favourites lists at any time.
Passwords
To set up parental controls, you need to choose a password for your system.
This is an important step. A secure password prevents kids from viewing certain channels or programs with rated content. It also must be entered before buying any Pay Per View movies or events. This ensures you can monitor all charges on your system.
Choose a password, up to 4 or 8 digits (depending on your receiver model), that is easy for you to remember. But don't make it so easy that children or others can guess it.

 How to set a password:
On the DSR 209, DSR 319, HDDSR 505 or HDPVR 530
- Press the 'OPTIONS' button.
- Choose Parental Controls (4).
- Choose Enable Locks (1).
On all other receivers:
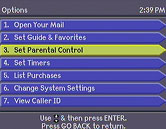
- Press the 'OPTIONS' button.
- Choose Set Parental Control (3).
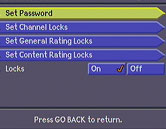
- Choose Set Password (1).
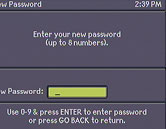
The system will prompt you to enter a password up to eight digits. Enter a numeric password and press the 'ENTER' button.
Write down your password and store it in a secure place. If you want to change a password, you must enter the old one.
If you forget a password, you can call a Customer Service Representative at 1.888.554.7827 and we can reset your system.
However, we encourage you to set up a verbal password on your account to ensure that you are the only one able to call and make a request like that over the phone. Our representative will ask for that password before changes are made on your account.
Parental Controls
This feature allows you to program the guide to prohibit children from seeing certain channels and programming.
You can lock out channels that carry programming inappropriate for children. To watch programs on locked channels, you need to enter a password.
This ensures you know what is being watched.
Learn how to set Parental Controls
Timers

It's very handy for taping programs that are on while you're out if are using a VCR. When using the Shaw DirectHDPVR 530, you can simply opt to set up a recording in place of a reminder and your show will be ready to watch when you are.
On older receivers, when you have a timer set, you won't be able to change channels or turn on or off the receiver. This is a fail safe to ensure your program tapes.
If you have a 401, 405, or DSR 315 model receiver, a clock icon will light up on the front of the machine to tell you there is a timer set. If you have another model, you'll have to look for the clock icon on programs in the Guide or call up the list of timers to find out what timers are set.
If you have a DSR 209, DSR 319, HDDSR 505 or HDPVR 530, hit "Options" on your remote control and then chose "5" to set a new timer.
Setting timers on the DSR 209, DSR 319, HDDSR 505 or HDPVR 530
From the Guide
- Scan the guide for programs showing in the future.
- Highlight a show in yellow and press Enter. Normally, this would bring up the show. But because this is a future show, it will bring up program information. You'll see a few different timer options on the screen.
- Choose Reminder (2) to set up an on-screen reminder for the show you are showing the info for. 3 minutes prior to the start of this program, an on-screen reminder will appear on the screen prompting you to change to the selected channel.
- Choose Auto-Tune (3) to set up your receiver to automatically tune to the selected program when it begins. An on-screen reminder will appear on the screen 3 minutes prior to the start of the program. Unless you cancel the reminder when it appears, you will automatically tune to the selected program.
- (HDPVR 530 only) Choose Record (4) to automatically record the selected program and save it to your DVR list.
Once you've set your reminders, auto-tunes, or recording you can check up on them by visiting the Timers screen in the options menu.
- Press the OPTIONS button.
- Choose Timers (4).
- You will see a complete listing of all your timers and recordings. You can press enter on any of these selections to delete or edit your selections.
- By editing a selection on this screen you add change your timer or recording to start early or run late so you miss the pre-game or overtime of your favourite sporting event.
When scanning the Guide, you'll see a clock icon appear for each show that has a timer set.
Setting Timers on legacy receivers
From the Guide
- Scan the guide for programs showing in the future.
- Highlight a show in yellow and press Enter. Normally, this would bring up the show. But because this is a future show, it will bring up program information. You'll see a Timer link highlighted on the top of the screen. Press Enter to bring up the timer screen.
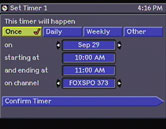
- The start time and end time will be filled in according to the Guide's times. You may want to use the number keys to add time to the end of the show. It's important for sports programs. If the game goes into overtime, you'll want to tape it all.
- Set the timer for that program once, daily or weekly. Use the arrow keys to change the option.
- Then, highlight Confirm timer and leave. Press Enter. It will ask for your password. Press the numbers and then Enter. The timer is set.
This can also be used to order a Pay Per View movie or event in advance of the airing. When setting up the timer, you can choose to order your purchase now. This is handy if you are ordering a Pay Per View movie or event for your kids to watch when you're out. Authorize the purchase when you set the timer, so they don't need to enter a password when the movie comes on. This protects your password.
Scan the Guide. You'll see a clock icon appear for each show that has a timer set.
Another way to set timers on legacy receivers
From the Options Menu
- Press Options to bring up the menu.
- Scroll to Timers (4).
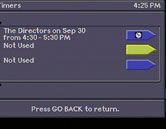
- This will bring up a list of all 25 timers. You can see at a glance which ones have been set.
- Highlight an unused number. Press Enter.
- This will bring up the timer screen. You'll have the option to enter the timer once, daily or weekly.
- Use the number keys to enter the channel, date and time. Or use the arrow keys to scan. Press Enter to store your choices.
- Highlight Confirm timer and leave. Then press Enter.
- You will be prompted for your password.